

Laboratory Exercise – Chapter 4
Thermometer Application
Problem Description:
Develop an application that will simulate a digital thermostat. The thermostat should display a numerical value indicating the temperature to the nearest whole number. The thermostat should allow the user to enter a low and high temperature range that will be considered the desired range for the temperature.
When the temperature is within the desired range, the color of the digital output will be green.
When the temperature is above the desired range, the color of the digital output will be red.
When the temperature is below the desired range, the color of the digital output will be blue.
Since you cannot connect your application to an actual thermometer, you will have to simulate the temperature rising and falling. You will accomplish this by adding two buttons. When the first button is pressed, the temperature will decrease by 1 degree. When the second button is pressed, the temperature will increase by 1 degree. After either button is pressed, the application should set the color of the output display appropriately.
The initial conditions of your application should be set up so that the temperature starts at 70 degrees and has a lower range of 68 and an upper range of 72.
Your application should look as follows:


In Desired Range Above Desired Range Below Desired Range
Problem Discussion:
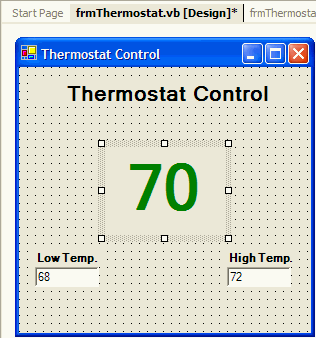
The layout of your application is relatively simple. Your application will require a text box for the lower and upper temperature range. Both text boxes should be labeled accordingly. You will need a button to lower and raise the temperature by one degree. You will also need a label to indicate the title of the application, as well as one to display the current temperature.
The solution to the application becomes a little more difficult when you think about what code is required to create the behavior indicated by problem description. While you could store the temperature only in the label, it is a better programming practice to store it in a variable. Therefore, you should create a variable
intCurrentTemp and declare it as a property of the form. While you can initialize the label through the Properties Window, you will need to initialize the variable in the form’s constructor.The only other code required is to raise and lower the temperature. This by itself is not complicated. You must increment or decrement
intCurrentTemp by 1 and store the result in the label displaying the temperature. However, now you must decide how you are going to update the color of the temperature display.You could:
Check to see if the current temperature is lower than the lowest acceptable temperature and if it is then set the color to blue.
If it is not lower, you could check to see if the current temperature is higher than the highest acceptable temperature. If it is, then you could set the color to red.
If both previous conditions are false, then the temperature must be in the desired range, so set the color to green.
However, if you performed the previous set of checks after lowering or raising the temperature, then you would be performing a calculation that is not required.
Examine the cases where the user increases the temperature by 1 degree. There are only two possible changes of color that can occur to the display. The color can change from blue to green or it can change from green to red. There is no reason to check to see if the color would change to blue, because a color can only change to blue from green if the temperature goes down.
Similarly, when the user decreases the temperature by 1 degree. There are only two possible changes of color that can occur to the display. The color can change from red to green or it can change from green to blue. There is no reason to check to see if the color would change to red, because a color can only change from green to red if the temperature goes up.
Problem Solution:
Step 1: Create an Application called
Thermostat.Step 2: Rename the form in the Solution Explorer to
frmThermostat.vb.Step 3: Change the
Name property of the form to frmThermostat.Step 4: Change the
Text property of the form to Thermostat Control.Step 5: Add a label control to the form.
Step 6: Change the
Name property of the label to lblTitle.Step 7: Change the
Text property of the label to Thermostat Control.
Step 8: Change the
TextAlign property of the label to MidddleCenter.
Step 9: Change the
Font Size to 16 and the Bold property to True.
Step 10: Add a label for the low temperature text box.
Step 11: Change the
Name property of the label to lblLowTemp.Step 12: Change the
Text property of the label to Low Temp.Step 13: Change the
Font Bold property to True.
Step 14: Add a text box for the low temperature.
Step 15: Change the
Name property of the label to txtLowTemp.Step 16: Set the
Text property to 68.
Step 17: Add a label for the high temperature text box.
Step 18: Change the
Name property of the label to lblHighTemp.Step 19: Change the
Text property of the label to High Temp.Step 20: Change the
Font Bold property to True.
Step 21: Add a text box for the high temperature.
Step 22: Change the
Name property of the label to txtHighTemp.Step 23: Set the
Text property to 72.
Step 24: Add a label for digital display of the temperature.
Step 25: Change the
Name property of the label to lblCurrentTemp.Step 26: Change the
Text property of the label to 70.Step 27: Change the
Font Bold property to True.Step 28: Change the
TextAlign property of the label to MidddleCenter.Step 29: Change the
Font Size to 48 and the Bold property to True.Step 30: Change the
Font ForeColor to Green.
Step 31: Add the declaration of the
intCurrentTemp variable.
Step 32: Add the code to initialize the
intCurrentTemp variable.
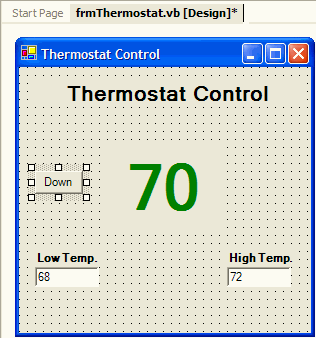
Step 33: Add a button to the form.
Step 34: Change the
Name property of the button to btnDown.Step 35: Change the
Text property of the button to Down.
Step 36: Add the code to the button’s
Click event. Follow the algorithm presented in the problem discussion.Step 37: Add a button to the form.
Step 38: Change the
Name property of the button to btnUp.Step 39: Change the
Text property of the button to Up.
Step 40: Add the code to the button’s
Click event. Follow the algorithm presented in the problem discussion.