|
Joseph Tarango |
|||||||||||
|
Home
|
|||||||||||
Lab 3: Asynchronous State Machine DesignIn this lab we will examine one of the most important concepts in embedded system design - the state machine. We are going to look at asynchronous state machines, as opposed to synchronous state machines. The difference is that asynchronous state machines do not have a concept of time or a clock that is used to advance from one state to the next. A code format for an asynchronous state machine is given. It is imperative that you stick precisely to the format that is given. You should not begin to write code until you have completed your state machine design on pen and paper.Today you will be building an asynchronous state machine that will perform various functions on two inputs, similar to how a calculator works. PORTSInput/Output of state machine.PORTA: User-selected function PORTB: Argument A PORTC: Argument B PORTD: Output FunctionsFunctions to perform based on value of PORTA
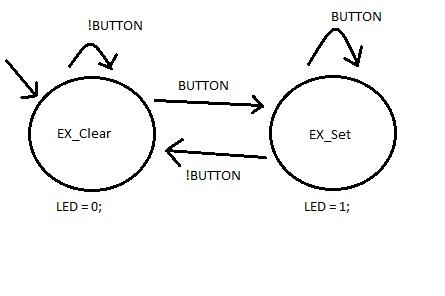
When PORTA = 0x00, a simple addition should be performed. When PORTA = 0x01, the high nibble of A should be concatenated with the low nibble of B. When PORTA = 0x02, A should be reversed such that Output7 = A0, Output6 = A1, Output5 = A2, etc... When PORTA = 0x03, then the output equals A modulo B. The key concept you should get from this lab is how to design and format a state machine. In this course we want you to think about how to design a system using a model (here, an asynchronous state machine), and to not focus on the actual coding. Before you begin to code, you should already have a pen and paper state machine drawn out. It is then a simple transformation from model to code. Below is an example state machine design, and the code that would be generated from it. For your own state machine design, the generated code should match the format of the code given below for the example state machine. There should be ZERO deviation in the formatting of the code of your own state machine from the given example format. Your code should contain enumerated state names, a second Tick() function, multiple switch statements for state actions and conditions, and a main loop. This lab will be graded 50% on how closely you followed the state machine code format. Note that in the below example, a prefix of EX (EXample) is used to specify variables that correspond to state machine specific characteristics, such as the current state. You should pick your own prefix to identify your state machine. Also, the code below is written for RIM, you of course will need to write code which will work on the AVR (and thus you will need to use correct IO names such as PORTA, and set corresponding DDR registers).  SAMPLE CODE:
POST LABINDIVIDUALLY prepare and submit a single-spaced half page report with the following information. Include the text of the deciphered message in your report.I. Lab Objective II. Personal Contributions III. Skill learned & knowledge gained. TurninINDIVIDUALLY prepare and submit all lab files into a tar ball. All .c files should be included in lab parts, as well as post lab submitted in pdf and txt format. All files should include a header with name, login, email, lab section, assignment, and group associates; also include: "I acknowledge all content is original."For Example Name: John Doe Login: jdoe Email: jdoe@cs.ucr.edu Lab Section: 021 Assignment: Lab 3 Group: John Doe, Jane Doe, and Joe Doe I acknowledge all content is original. Tar ball command: tar -cvzf name.tgz *.c *.pdf *.txt The tar command will compress all files into a .tgz file with all .c .pdf, and .txt files in that directory. Do not include unnecessary files! The .c files be named as follows lab#_part#.c and the postlab#.pdf/postlab#.txt. For Example: lab3.c postlab3.pdf postlab3.txt |